Quick trip to NYC….

NYC is an exciting place…especially in December! We went last December and it was amazing. So, I was thrilled when the honey surprised me with another trip again this year! We covered a lot of ground in our previous trip. We visited the 911 Memorial and museum. We took a ferry ride to Staten Island to see the Statue of Liberty. We saw the Rockettes in the Christmas Spectacular at Radio City Music Hall and saw the Broadway show, Alladdin.  We visited the Empire State Building, the One World Trade Center, China Town, Little Italy, took a carriage ride through Central Park, a walking tour of all the amazing Christmas window displays, and etc (etc…including a lot of stuff that would make this post too long lol)… That being said, there is never enough time to see and or do it all! 

On this trip, we felt a little more comfortable in our surroundings and managed to cover a lot of ground yet again. I thought I would share some favorite stops with you all. (I apologize for the picture overload).

We stopped in to see The American Museum of Natural History.

Where’s Waldo Tina? 🙂

IMG_5826

Maybe it’s the teacher in me, but I was blown away by the fossils……

The Dinosaurs….Wow!!!

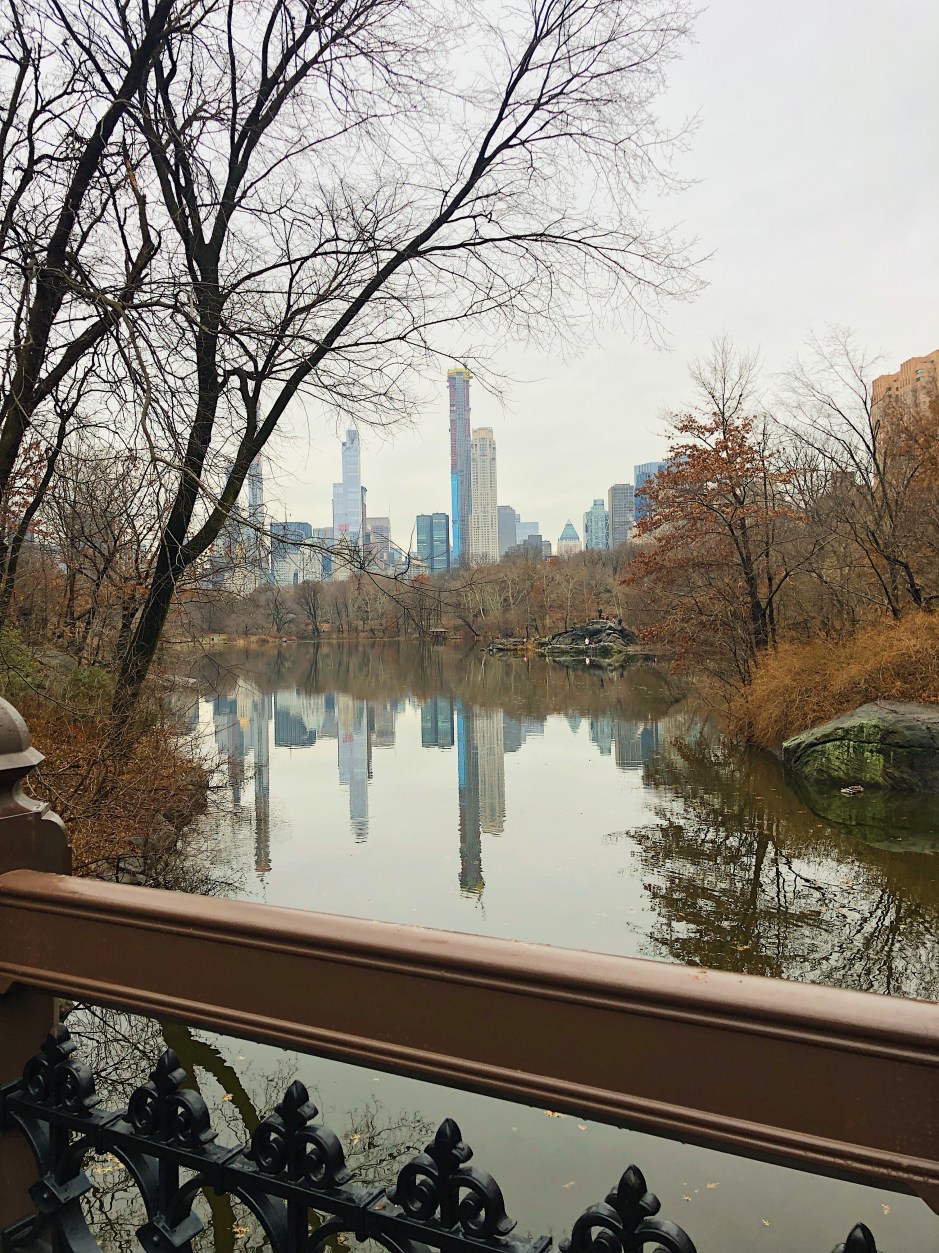
We then took a stroll across Central Park to our next stop.

The Metropolitan Museum of Art.

Yes, that is a Picasso and No, that isn’t a bathtub….it’s a sarcophagus (stone coffin). Would it not be an amazing bathtub, though???  Wow!

We went to see The Lion King (which was awesome). It was a rainy afternoon. So, while waiting for the show to begin, I purchased tickets to see Chicago on Broadway later in the day…because who wants to walk around in the rain lol

The next day, we stopped by the Ellen’s Stardust Diner for desert before seeing Wicked which I happen to think was out of this world!

We had a wonderful dinner at Carmines! While there, we asked our server who had the best Cheesecake in NYC and he told us about an awesome place located in Hell’s Kitchen called Tavola’s!  Well, it did not disappoint!  It was the coolest little place that used to be a grocery store.  

Our most favorite stop was the Brooklyn Bridge. We first had dinner at a little Pizza place tucked under the bridge called Juliana’s (thanks Polly).  It did not disappoint. It was amazing! It was located beside the families’ original location called Grimaldis’ Pizza. I did a little research and there is an interesting story behind the two competing Restaurants. At any rate, we chose Juliana’s Pizza and it was wonderful. 

After dinner, we strolled across the Brooklyn Bridge!  I thought it would be scary (you know….the height thing), but it wasn’t at all!  It was amazing!  The views were incredible! You could see for miles and the Statue of Liberty was visible in the distance as well. It was my most favorite activity on this trip and the best part….it was free!

Another favorite stop was Grand Central Station. I never realized how incredible it was… considering I had only seen it in movies lol. It really is a beautiful place! We even had lunch there at the Shake Shack per another recommendation. 

We visited the High Line. It is definitely a cool site, but I think it would be much more appreciated in the Summer months when the vegetation is in full bloom.

We then made our way back to the Gershwin Theatre to see Wicked and it was out of this world!

7932ED67-F8F5-4764-A732-E89137A12EE7

We checked out Bryant Park, the New York Public Library, and NBC Studios & Rockefeller Plaza as well.

IMG_5928.JPG

I’m already looking forward to the next trip….

signature-png 2


DIY Console Table

ECAC0CDC-13C3-498A-BFA1-3B0D65E22373

I have been wanting to redo this space in my breakfast area for some time.  It is a tight space because I have a hutch on the left side of the table and this little table on the right side. The table is really too short and too wide for the space.  Okay…if I’m truly honest about the situation…I need a table that is longer and has more storage to display/store my growing collection of Rae Dunn Pottery.  I want to stop buying it….I really do….  It’s all Rae Dunn’s fault!  She will not quit making cute pottery!  So, I have no other choice, but to build a new table to house it all 🙂

IMG_1443

I did look for a table to purchase, but nothing I found was quite right for the space…at least not according to the picture in my head.  So what is a girl to do you ask?….Well, she just needs to go search through the many Ana White furniture plans at www.ana-white.com and find the perfect table. So, I did just that!

IMG_1439

I selected the Rustic X Console Table.  I loved the design, it was longer than my current table, had three levels of storage, and it was shallow which would allow more space around my breakfast table.

FullSizeRender-1

I printed off the plans, headed to Home Depot for supplies, and got started.  It also provided me a reason to use my Kreg Jig for the first time and I love it!  It was an easy build, and I felt quite accomplished once it was completed.  My table has some intentional flaws to give it a distressed look and a few unintentional ones, that I hope you can’t see lol.

IMG_1446

The best part is that it really does hold a lot of my Rae Dunn collection allowing me to clear out the many piles that had taken over my craft room.  Now on to my craft room makeover… 🙂

IMG_1447

FullSizeRender-2

Want to make your own?  Click the link below to access the Ana White free plans.

Rustic X Console Table


signature-png 2


DIY Upholstered Headboard

When I began to plan the master bedroom “mini” makeover, I knew I wanted to remove our existing headboard and build a new one.  I wanted a softer look so, I decided to build/upholster a new one.

1178769C-B31E-47D6-AFC0-74DAC1E62B4F

I began the project by sketching the shape I wanted for the headboard. I then measured the width of my bed and determined my desired width and height for the headboard. I used that information to plan how I would build it….

While I love to browse around Home Depot and Lowes, I am adamant about having a detailed supply list when shopping for my materials.  Therefore, I planed every cut and created a supply list and cut list.

I made my purchases, drew the shape I wanted on my plywood, and cut it out.  Note: After drawing the first “curved” corner, I made a template to trace for the other one to make sure they would be exactly the same. I then duplicated it for the back.

img_4802-copy.jpg

IMG_4833

I sandwiched the legs between the front and back pieces of plywood.I added wood pieces around the top and bottom edges as well. This provided the thickness I wanted it to have and allowed the legs to be mostly concealed.

IMG_4825

I added smaller blocks of wood to mimic the curves.  I was then able to add the back piece.  Note:  I also added a few pieces of wood in the center to keep it sturdy and taunt.

IMG_4853

In hindsight, I should have upholstered (or painted) the legs before attaching them.  It would have been much easier than doing it after the fact.

IMG_4855

After attaching batting to the front side of the headboard, I drew a line around the edges  approximately three inches in to mark where I wanted the nail heads to go.  I stapled the batting along the line to create an indention.

IMG_4859

IMG_4864

Next I added the fabric. I chose a gray “faux” velvet and feels incredible.  I am a texture person…I know it is silly.  However, if it doesn’t feel good to the touch, I don’t want it. I added a fabric chalk line around the indented edge to serve as a guide for keeping the nail heads straight.

IMG_4875

Once again, I stapled along the line where I wanted to place the nail heads to give it more definition….making sure to stay on the line.

Now here is the cool part. When I went shopping for nail heads, I didn’t like the look of the “faux” nail heads that come in a strip and you hammer in every fourth or fifth one.  I couldn’t find enough individual ones that matched to do the project either.  Yes, I know I could have ordered them and have them in 2 days, but I wasn’t patient enough for that.  So….I came up with a different idea….thumb tacks!  I stopped by the dollar tree and purchased several packs.  They obviously aren’t designed to work on this project so just hammering them in like a regular nail head wasn’t an option. The pins weren’t long enough.  So…what’s a girl to do?  When all else fails….grab a glue gun!  I snipped off the pins with wire cutters and glued the heads over the staple line.

I was amazed at how well it worked and I was very pleased with the end result.

E7862993-9541-42BE-8B8A-3C026A980F52


signature-png 2

Saturday Antiquing

I had a itching desire (is that a saying?) to go antiquing this morning…after I did a bit of “hunting” for Rae Dunn Pottery this morning, I decided to head over to Angels Antiques.  Angels is located in an (very) old Walmart building.  I had Transferware on the brain.  No…I didn’t have any luck with that, but I did see a lot of cool stuff.  I did come across a few items that caught my eye, though.

Moderntone Platonite glassware was made by the Hazel Atlas Company.  I discovered it through a magazine article I read about fifteen years ago.  (I wish I could locate that article now). I instantly fell in love with it and have collected several pieces over the years. It was made in many colors with the pastels being super popular. Most of my pieces are white.  You can see the white sherbet dish in the front far left.  The green dish in the top left is also from Moderntone Platonite.  Some of the white pieces have a colored rim as you can see in the bottom two pictures.  I have a few pieces with the green rim.  I think I was drawn to the ridge pattern on thee pieces.  I am certainly not an authority on Modertone….I just like it.

How cool are these?  They are brick molds.  I am trying to convince myself that I don’t need them lol

img_8967.jpg

I thought these were cool.  I guess I’m drawn to old books too. Honestly, I am drawn to a lot of things…too many things.

IMG_8964

Vintage Johnson Brothers Strawberry Fair China.  So pretty!

img_8965.jpg

Who doesn’t love old rolling pins.

IMG_8971

No idea why I took a picture of this…lol

IMG_8968

I already have this white Fire King mixing bowl.  I also have it in Jadeite.

img_8989.jpg

This was a cool booth.  So creative and cute.

IMG_8979

I also have a vintage Clorox bottle similar to the one here (on the right).  Mine has a cool story behind it. My husband and I went on a walk through the woods on his great-grand parent’s property.  We stumbled a pile of various vintage bottles.  Most were broken, but a few were in tact.  So, of course, they came home with me.


Who doesn’t love an old school locker.  I would love to find a set of smaller ones to repurpose.  Maybe on another day.  I also liked the corbels in picture 2 and I’m a sucker for old insulators.  The colors are so pretty to me.

I passed on most things since I was actually there looking for something specific.  I did bring home a blue ball jar and a vintage Air Force Cookbook from my son’s base.  There was a lot of eye candy, but no transferware.  Maybe next time…


signature-png 2


Master Bedroom Makeover

When I decided to makeover our master bedroom, I immediately went to Pinterest to find inspiration.  I knew I wanted to work with variations of gray and white.

FullSizeRender-1

Candace Olson

https://www.pinterest.com/pin/69031806758289812/

Another one that caught my eye…

awelldressedhome behr ashes

A Well Dressed Home

www.awelldressedhome.com

And…you can see why.  The previous owners had painted the room a Benjamin Moore color – Decatur Buff which happened to be a color I used in our previous home. Therefore, the color worked with my bedding, but I was ready for change.

IMG_7307

This was the master bedroom in our previous home.  I loved it at the time and it had a warm a cozy feel.  However,  I wanted our newly purchased home to have a complete different feel.

104812_22[1]

Once I had some inspiration, I was ready to go.  I painted the walls (Behr Ashes) and the tray ceiling.  I just have to share…I have never understood why anyone would paint any portion of the tray the wall color?

IMG_4467 - Copy

Unless it is somehow considered a “special feature” at the final level such as this (my  master bedroom in our previous home).

104812_24[1]

If you are not of the same mindset, I’m so sorry.  It is not my intent to offend anyone. So, please let me justify my point of view…The ultimate purpose of the tray is to draw the eye up and visually make the room “feel” larger. So, if you paint a stripe right in the middle of it, that is where the eye stops and it defeats the whole purpose.  Am I the only one that thinks that?  Anyway, I couldn’t wait to get rid of the stripes.

IMG_4511 - Copy

I really wanted to reuse as many of my previous furnishings as possible.  I painted my furniture (Chalk Paint), my drapery hardware, furniture hardware, my lamps, and everything else in reach. I bought an upholstered bench in a thrift store that was the perfect size for the end of the bed. I stripped it down and reupholstered it.

I then took on the task of building a custom upholstered headboard to replace our current one. (More information on that to come).

I did everything except scrape the ceilings.  I sooo want to do that, but I am just not ready to tackle that monumental task.

I haven’t found exactly what I want in terms of accessories for the room, so I am sure I will tweak it along the way.  Overall, though, I am very happy with the outcome of the master makeover. It is definitely my happy place. 🙂

IMG_6926

IMG_5245

IMG_6929

signature-png 2